
How to write a simple content modifying Chrome extension
A Chrome extension that hides the details of people’s deaths from Wikipedia, allowing you to rest easy in the knowledge that everyone ever is alive. And not dead.

Writing a Chrome extension can be a bit tricky initially, due to it’s API and the way you have to structure your code. The docs are fairly good however, so take a look at them when building your tool.
In this post I want to show how you can write a simple extension that modifies the content of the page once it’s loaded. This is a method used by extensions like the various adblockers to identify and remove adverts. It’s a good place to start since it gets you used to the environment without getting too complicated. The whole lot is in javascript, which gives you easy access to the DOM and is essentially like writing client side code except you have a few extra APIs for access to the browser and code is scoped meaning you can’t communicate with code that the page loads.
Setting up
Every extension needs a manifest file. It declares what files are a part of your project and tells Chrome how to use them. You also set metadata like icons and descriptions which will be used when you upload your extension to the Chrome app store (this is the only sensible way to distribute it outside of a corporate environment).
1 | { |
All the files for your extension should be in the same directory, which will be zipped up when you upload it. The manifest is what binds it all together. If it’s not referenced in there, it won’t be used.
Architecture of an extension
- Background page - not visible by the user. A long running script that handles the state of your extension. Communicates with other parts of the extension with messaging.
- Event page - the same as a background page, but only executes in response to events you define. Preferred to background pages as they are less resource intensive.
- Options page - UI page that allows a user to set options. An HTML page that references javascript files.
- Browser actions/page actions - an icon either in the extension bar or the omnibox respectively. Clicking on the icon will show a UI tab which is an HTML page that can reference javascript. These pages cannot communicate with the website resources/DOM, it needs to message the content script to do that.
- Content scripts - javascript only. What is used to modify the page itself. The only part that can access and modify the DOM but not code loaded by the website. Files are run once for each page that matches the manifest. All the JS files in the list are loaded, so you can use libraries just by including it. This is what we’ll use for our extension.
There are plenty more elements that can be used in an extension, but this list covers the core that will get most of your extension built and most other parts are for specific tasks.
Permissions
When users see ‘This extension can see and modify data on all pages’, they get nervous. So it’s best to limit where your extension will be active by explicitly setting permissions in the manifest.
1 | "permissions": [ |
In this case, the extension will load content scripts when on any page on Google and use the tabs API. * is a wildcard matching any number of characters including none, ? matches any single character. So b?b would match bob and bib but not boob. See more.
You’ll also need to specify what pages your content scripts will match and run on. More on this in the next section.
Writing your own extension
I’ll now go through the steps of creating an extension I wrote recently called Undead that removes details about people’s deaths from Wikipedia. I made it because I often watch old films and google the cast and then am shocked and saddened to find out that actors that were young attractive women in 1938 are now dead. So this extension allows me to live in a glorious past where everyone ever is still alive.
Manifest
Let’s start with the manifest. We need to state which version it is, if you’re uploading a new version to the web store, the version number must be greater than the existing one. Don’t confuse this with the manifest_version, which is always 2 and is not extension specific.
Create a new folder called ‘undead’ then a new file called ‘manifest.json’ inside it and copy the following into it.
1 | { |
You must supply 3 icons at sizes 16, 48 and 128 px. These are used on the extensions page and the toolbar. Download them here and save them into the directory at the same level as manifest.json:
You can now load your bare bones extension into Chrome. Go to Window -> Extensions to open the extensions page. Tick developer mode on the top right which allows you to load your own extensions. Click the ‘Load unpacked extension’ button and then select the ‘undead’ directory. You should now have something that looks like this:

There you go. Technically that’s all you need for an extension. But it doesn’t do very much of course. To modify a page we need a content script. Add the following to your manifest in addition to the above:
1 | "content_scripts": [ |
Now save a new file called undead.js and the following as the content:
1 | window.onload = function() { |
Go back to the extensions page and hit reload (this is very important. If you ever wonder why nothing changed even though you updated the code this is probably the reason).
Go to a page on Wikipedia and now you should see this: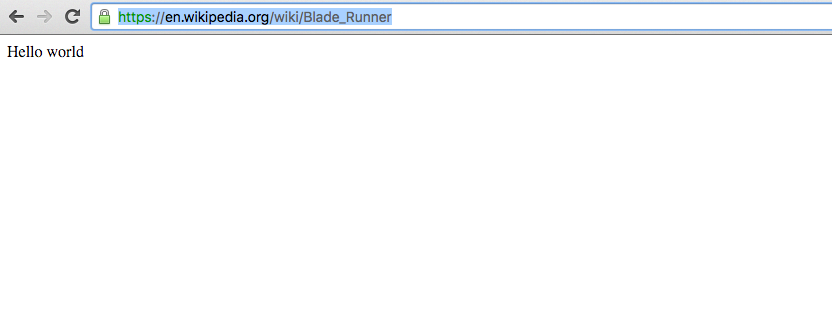
Great! Now we could write the whole lot in native javascript, but it’s useful to see how we can have multiple files and use libraries so let’s drop jquery in there too. Download it from here and drop it in the top level of the extension directory. Then update the manifest to include it:
1 | "content_scripts": [ |
Now we have jquery available to us so we can select elements in the page and remove them. Let’s start with the ‘Died’ part of the table on the infobox.
Get rid of the code in undead.js and put this there instead:
1 | $('th:contains("Died")').parent().hide() |
Reload it and have a look at a dead person’s page. Well, it’s a start. Here’s some more comprehensive rules I came up with:
1 | $('th:contains("Died")').parent().hide() |
Reload. That’s working a bit better. But it’s still a bit slow. When javascript runs in the browser it runs immediately, which is why we normally use $(document).ready or similar to delay the execution of that code until the DOM has been constructed. However Chrome doesn’t run the code until everything has loaded, the equivalent of window.onload, making the window.onload callback in the first example unnecessary.
We can choose when we want the content scripts to be injected. Choices are ‘document_start’, after css is loaded but before DOM. ‘document_end’ after DOM complete but before images and the default ‘document_idle’ after window.onload. If we used the first one we’d end up with no changes, because it would run before it has any content to manipulate. So update manifest.json to include this:
1 | "content_scripts": [ |
Now it should run without an annoying gap inbetween the page load and rerendering.
Adding a browser_action
Maybe sometimes the user should face up to reality and find out the truth. We could add a bit more functionality to this by creating an undo button that adds back all the death notes to the page. To do this we’ll need a browser action with a button that sends a message to the content script, which will then revert to the original content.
Create a popup:1
2<script src="popup.js"></script>
Goodbye world
and the JS file:1
console.log('A message')
You’ll see this: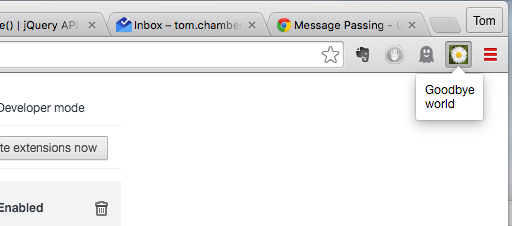
Reload. Check the console of the page and… oh, nothing there. The browser action writes to its own console since its separated from the page. Right click the icon and click ‘Inspect popup’ to see the separate console and you’ll see its message.
Now update these files to create the functionality of a button that sends a message that can be received and acted on by the content script:
1 | <!doctype html> |
1 | $(document).ready(function() { |
1 | var copy = $('body').clone() |
Now you can open up the popup and reverse the effect of the extension at will. In this case $(document).ready is necessary because javascript loads normally as specified in the HTML rather than injected in by Chrome.
Note: this is a very simplified version of what should happen. If this was a real extension it would be a good idea to add a background page that manages state to prevent too much complexity in the UI files and set a tab target and parameters to your messages to limit its effect. Take a look at message passing to learn more.
Now you know what’s possible, I’m sure your head will start fizzing over with interesting and useful things you can add to the browser. For a reference once you’ve grasped the basics, see the Developer’s guide. The code is a repo on my github. If you need help please email me on tom.chambers@gmail.com.